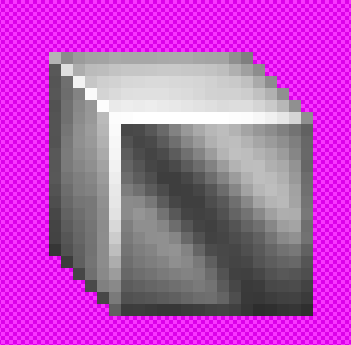
Guild icon
The Wolf3D.net Discord
GameDev / artistry / Art Lecture 1
Avatar
Welcome to the first art lecture! We're gonna be learning the art of spriting and texturing, in sessions lasting an hour or two each. My chosen image editor is Paint Shop Pro 9, but you may use whichever tool you desire. However, I would recommend something that supports layers and various filters. I've heard Paint.NET is good. Anyway, we'll discover the tools of the trade together and make sure this course stays as tool-agnostic as possible. At first we'll practice shading simple shapes, and using layers and coloring, so everyone gets familiar with these basic features which we'll be using a lot. Then we'll move on to create a simple wall texture, a wall texture with a decoration on it, and finally an actor sprite. To start off, I'd like everyone interested to have their tools ready, and post a screenshot of what their editors look like so I know what I'm working with. Also, I'd like you to think of an idea of what kind of wall to draw. Please keep spam and off-topic chatter out of this topic, and unrelated art discussion in #artistry 🎨 🐀
2:06 am
As for myself, using PSP9 as I said, and I'll make a Blake Stone style tech-wall.
Avatar
spiciestpepper333 2/9/2022 2:10 am
wooooo
2:10 am
lets fucking goooooo
Avatar
I'd like you to think of an idea of what kind of wall to draw.
And to be clear, we won't draw the wall right away; I just want you guys to have an idea. As said, shading some primitive shapes first
Avatar
My copy of PhotoImpact X3. The upper toolbars are in the wrong places because I dragged them around once by accident and dragging them back makes it crash
👍 1
Avatar
The first thing I'd like you to do is create a 64x64 transparent image, and draw a filled circle on it, like this.
2:30 am
It doesn't have to be centered whatsoever. The color is preferrably grey.
2:32 am
wow why did photoimpact draw that asymmetrical
Avatar
Ideal results for perfect pixel circles can be achieved with some tricks, but we'll get into those later.
2:33 am
Next, I would like you to create a copy of the circle on a new layer.
2:33 am
Avatar
If you browse the properties for the layer, what do you see?
2:36 am
2:36 am
the third tab is for web buttons, I've never used it
Avatar
The mode we're looking for is either called overlay or lighting or something like that; basically it will lighten or darker the layer below it
Avatar
I've got overlay, lighting, multiply, hard light, and soft light that do it in different ways
2:38 am
for textures I usually use hard light
2:38 am
hard light doesn't lighten or darken though, it colorizes
Avatar
I'm gonna use overlay, and disable the bottom layer temporarily
Avatar
And now color the sphere on this upper layer as a midtone grey (RGB 128, 128, 128)
Avatar
now it's invisible, which is what I expected
Avatar
OK, now let's browse for some tools
2:41 am
Do you have a lighten/darken brush?
2:41 am
2:42 am
dodge looks like the best I have
Avatar
I think in this case we'll just use normal brushes instead. With white as the 1st color, and black as the 2ndary
Avatar
done, what parameters like size, opacity, soft edge, etc
Avatar
You need to select the circle before brushing away, I do this with the magic wand
2:44 am
Anyway, what I want you to try is shade the circle, so it looks like a 3D sphere. Before I instruct you how I do this myself, I want to see how people do this themselves
Avatar
Here's mine.
2:48 am
I did this with one brush stroke.
Avatar
Damn, really? I used like 8 of them, and adjusted the brush settings several times
Avatar
Make the brush about the size of the sphere, set the softness and opacity to maximum, and just click somewhere around a spot like that.
2:51 am
For the backlight, I used a little trick, which involves no drawing at all. I'm not sure if everyone's editor has this feature, but there's a way to adjust the brightnesses of different shades separately.
2:52 am
In PSP9, this is called "Curves". In some other tool it might be called "Levels".
2:52 am
Maybe I should make the base sphere darker
Avatar
I think you should do that, and also reduce the opacity of the brush, and make the hardness zero.
2:53 am
If you don't get similar results, you may have to first do a larger, faded blotch, and then draw a brighter, smaller one at the center of said blotch. (edited)
2:54 am
Anyway, this is how I use the brightness curves to create the backlight.
2:56 am
darkened the background of the ball
2:56 am
Do you want me to redo the highlight first
Avatar
You should probably redo the highlight, yes.
2:57 am
The brush should definitely be large enough to touch the entire circle, even when you're not drawing to the middle of it.
2:57 am
That is, the furthermost edge that it ends up painting, should reach the far side of the circle.
Avatar
two strokes, one huge, one smaller
Avatar
That works better
Avatar
...once I learn curves could I use them for palette matching blazthink
Avatar
Curves are an essential tool for correcting the shading of an image, so it looks good
Avatar
Lightening up details that are too dark, increasing contrast for shades that blend together too much, etc.
Avatar
Avatar
Aurora
Anyway, this is how I use the brightness curves to create the backlight.
See mine makes a V-like shape
Avatar
One can experiment with different colors for the base circle, and different blend modes for the shading layer, so you become familiarized with how they work.
Avatar
Avatar
Executor
Click to see attachment 🖼️
Very good, it's starting to look like a proper backlight
Avatar
Any suggestions on how to tweak it more
Avatar
I'd use the curves to make the bright spot's gradient more even
3:04 am
and brighten up the edge of the backlight, if you can
3:04 am
this is tricky lol
3:05 am
Pulling on a point pulls the whole curve around
3:08 am
Avatar
You can also tweak the backlight by hand, or even create it fully by hand. I'd pick a soft brush about half the size of the sphere and carefully go along the periphery.
3:11 am
Avatar
That's quite good, though the light should be brightest on the side that's opposite to the bright spot.
3:12 am
follow the imaginary circle around that bright spot
Avatar
very good
Avatar
Feel like there's too much banding between the shadow and the backlight but maybe that just takes practice
Avatar
I think we're done with spheres for now
Avatar
Avatar
Executor
Feel like there's too much banding between the shadow and the backlight but maybe that just takes practice
It doesn't have to be perfectly realistic, but to me it looks fine. Looks interesting.
Avatar
Now I want to use what I made in a Sonic 3 special stage parody hansjoy
3:14 am
so what's next
Avatar
Next a small cube sitting on the floor, about a third of the canvas' height. With three sides visible.
3:15 am
If you could, please draw the outline for that, the way you would see it.
Avatar
a bit misshapen
3:19 am
adjusted slightly, maybe I should use copy+paste for the parallel lines?
Avatar
dunkelschwamm 2/9/2022 3:19 am
I am just catching up. I made a sphere though 😄
👍 2
Avatar
If you were to add perspective, then the edge further away would be shorter, not the other way.
Avatar
Avatar
dunkelschwamm
I am just catching up. I made a sphere though 😄
Very nice there.
Avatar
a bit closer
👍 1
Avatar
I'll do a similar one then
3:23 am
Alright, now color the sides different colors, like red blue green, arbitrary colors. We'll replace them soon.
3:24 am
And paint over the outlines, so the outlines disappear.
3:25 am
Avatar
dunkelschwamm 2/9/2022 3:26 am
3:26 am
Avatar
these kind of look like the X/Y/Z axis indicators in 3D modeling programs
Avatar
Now, if light were to shine on your box from an angle like this, and your box was grey, then please shade the box the way you believe it would be lit.
3:29 am
The imaginary lamp is positioned exactly sideways from the red surface in my picture.
3:29 am
Oh I see, side lighting not front
3:29 am
Avatar
Yes. About right, I did the same thing
3:30 am
Now, do something to the cube to make it look as if it were metallic.
3:34 am
lol it looks like a bad '80s album cover
3:35 am
Dethhair - Cubes of Love (1986)
Avatar
Not bad. I'd adjust the brightnessess of the sides so the overall shading is not overwhelmed by the metal shine.
3:36 am
Avatar
dunkelschwamm 2/9/2022 3:37 am
Avatar
I put the shading on a separate shading layer, again.
Avatar
dunkelschwamm 2/9/2022 3:37 am
oops did I do the streaks the wrong way
Avatar
I don't think the direction of the streaks matters. However, what does is that the streaks are not continous across surfaces.
3:38 am
If that is meant to be a small groove near the edge of the front surface, then I would erase the shading streaks from there.
3:39 am
Now the front is too bright
3:40 am
Avatar
is paint shop pro paid software?
Avatar
Definitely see the advantage of the ripple effect over the single line
Avatar
Avatar
Kovacs
is paint shop pro paid software?
It is but I'm using a 20 years old version.
3:42 am
So to really make the cube pop, make the metal shine come through, and add to the 3D feel, I add a bright line between the visible edges - where light is reflected to all directions, because the surface 'turns' there.
Avatar
also i think i missed something, what tool is being used to draw the streaks, the same L/D brush? (edited)
3:44 am
as the circle i mean
Avatar
I selected one side, created a new shading layer, filled it with grey, and then used white/black or L/D brush to make long strokes.
Avatar
did a trick here, instead of simply drawing a line, I created selections with a gradient fill so it brightens towards the intersection
Avatar
Alternatively, there is probably a gradient fill tool available.
3:48 am
Ah yes.
3:48 am
Your cube is actually turning out to look better than mine, haha
3:49 am
You can do some final shading by hand, with a large brush touching on the periphery, very gently. This requires practice and a fine mouse hand, and an artist's eye, so don't worry if you don't get that right.
Avatar
I should use the DPI lowering button on my mouse for this
Avatar
Avatar
Aurora
So to really make the cube pop, make the metal shine come through, and add to the 3D feel, I add a bright line between the visible edges - where light is reflected to all directions, because the surface 'turns' there.
how were the transparent lines done
Avatar
I simply drew the white lines on a new layer first, and then used a smooth eraser brush to fade them out.
3:51 am
Erasing more from areas further away from the viewer/the light
Avatar
Avatar
Aurora
You can do some final shading by hand, with a large brush touching on the periphery, very gently. This requires practice and a fine mouse hand, and an artist's eye, so don't worry if you don't get that right.
so like in this, with the edges of the brush? (edited)
Avatar
dunkelschwamm 2/9/2022 3:52 am
I think I might be having a bit too much fun with lighting
Avatar
Avatar
Kovacs
how were the transparent lines done
for mine I created selections for the two straight lines of the same length and used the gradient fill to fade from white to medium gray along the length of the line. For the angled line I flattened the image, selected the angled edge of the cube, copied it to a separate image, trimmed it to just the edge, undid my flattening on the base image, pasted it in place, and did the gradient fill
3:53 am
A bit laborious but it came out looking nicer than I expected
3:54 am
Actually I'm surprised at my cube
3:54 am
I thought it was going to be horrible
Avatar
Avatar
dunkelschwamm
I think I might be having a bit too much fun with lighting
looks kind of translucent, like ice
Avatar
it seems like everyone is a bit too many steps ahead of me because i know less than nothing lol
Avatar
Avatar
Kovacs
so like in this, with the edges of the brush? (edited)
3:55 am
My bad really, first time doing these lectures, so I'll know to be thorough next time.
Avatar
Avatar
Aurora
Click to see attachment 🖼️
ah it's how i imagined then
3:56 am
go on
3:57 am
this event caught me off guard so i'm not being hands on but i'll keep up
Avatar
I'll show how the reflective shading is done too
3:58 am
Avatar
redid the final shading
Avatar
That was a bit of a quick job compared to the original I did, but eh
Avatar
Avatar
Executor
redid the final shading
Beautiful
3:58 am
I might darken the lower right edge a little more
3:58 am
and the bottom edge
4:00 am
Now has anyone thought of a kind of wall they'd like to do? We won't start yet, I'll wait for everyone to finish, but just in the mean time, playing with ideas
Avatar
Avatar
Aurora
Now has anyone thought of a kind of wall they'd like to do? We won't start yet, I'll wait for everyone to finish, but just in the mean time, playing with ideas
cinder blocks maybe?
Avatar
Can you show me a photo of the type you mean?
Avatar
Try drawing your cinder block wall now with what you know about shading objects comprised of right angles. (edited)
4:08 am
My final cube, by the way
4:08 am
I used gamma correction to darken it a bit
Avatar
damn it crashed!
Avatar
I think Woolie's ended up looking more metallic and better because he used a tool to create gradients, which look unnatural - which is exactly what a metallic cube is. (edited)
Avatar
all those cubes...lost in time...like tears...in rain
Avatar
Avatar
Aurora
My final cube, by the way
were lines drawn at the bottom and right side edges, just black instead of white?
Avatar
OK for some reason "Add Noise" causes PhotoImpact to explode
4:12 am
I think I might have to cut this one short until I can figure out the problem
4:12 am
Because to make mortar I need noise
Avatar
You could simply take a random image off the Internet and size it down.
4:13 am
Avatar
Avatar
Kovacs
were lines drawn at the bottom and right side edges, just black instead of white?
I did not do that, however, you could.
4:14 am
It's one way to shade the far edges. I did it like this:
Avatar
Avatar
Aurora
You can do some final shading by hand, with a large brush touching on the periphery, very gently. This requires practice and a fine mouse hand, and an artist's eye, so don't worry if you don't get that right.
.
Avatar
it did end up looking like the same process as earlier was used, even if it wasn't done (edited)
Avatar
dunkelschwamm 2/9/2022 4:15 am
this is my current output
Avatar
In retrospect, drawing black lines on a new layer might have been even better. (edited)
4:15 am
But doing shading by hand with a brush can give a sprite an interesting, unique look about it.
4:15 am
Definitely so for organic stuff.
Avatar
ah i see, looking at the gif again
Avatar
@dunkelschwamm not bad, but I'd not make such soft lighting near the edges. The cinder blocks look more like pillows now.
4:16 am
I'd also go easier on the cubes' reflections, which end up eating all of the directional shading. (edited)
Avatar
Fiddling with compatibility settings, not making progress
Avatar
Avatar
dunkelschwamm
this is my current output
yeah if i'm allowed to make comments, the reflection on your cube looks like it's leaking to the other sides
Avatar
I need to get the PhotoImpact Pro disc from work
Avatar
dunkelschwamm 2/9/2022 4:18 am
yeah I got carried away with the chrome reflections and ended up with something I ended up liking the aesthetic too much to continue working on lol
Avatar
i like the wall though
Avatar
dunkelschwamm 2/9/2022 4:19 am
the pillowing of the bricks I'll work on
Avatar
I mean a cube can look like that, light can behave in many ways; but I'd remove some of the leaking from the front face to the sides anyway so the geometric shape doesn't disappear in a dazzling bright reflection
Avatar
i imagine the angle would change at the very least
4:21 am
instead of looking like the reflection is on a different plane from the rest of the structure
4:24 am
So what I do is draw a concept of my wall on paper first
Avatar
finally got something to work
Avatar
dunkelschwamm 2/9/2022 4:28 am
4:28 am
new wall on the right
Avatar
The right one looks better
👍 1
4:28 am
To make it more interesting, I'd brighten the top and left edges more
4:29 am
and I might apply a very light gradient on the blocks
4:29 am
Perhaps make them ever so slightly uneven
4:29 am
in lighting, shading them from different ends
4:29 am
add noise
4:30 am
Since we're creating a game and not necessarily going for photorealism, some extra things are allowed to make the graphic look more pleasing
4:30 am
So anyway, I then sketch my texture on a new layer
4:32 am
Experimenting with colors on a layer underneath that
Avatar
dunkelschwamm 2/9/2022 4:34 am
4:34 am
in wolf palette
Avatar
Not bad at all
Avatar
Avatar
Executor
Click to see attachment 🖼️
First off - nice texture. Secondly, your shading surrounds the entire image. It should go on a single cinder block instead
Avatar
Avatar
Aurora
So anyway, I then sketch my texture on a new layer
And I forgot to mention - I use the aid of the grid in placing the sketch lines.
Avatar
Avatar
Aurora
First off - nice texture. Secondly, your shading surrounds the entire image. It should go on a single cinder block instead
there is no shading, I think something is wrong with the texture itself
4:39 am
shading looks like this
4:39 am
I am kind of frustrated so it's hard to think clearly now
Avatar
That looks good
4:40 am
Now you can copy that shading layer onto all the other blocks
4:41 am
as for the edges of the texture, we can look into it another time, how to make a non-tiling texture continuous.
Avatar
how would you do this cinderblock texture aurora
4:42 am
i'm kinda confused where this shading is being applied
4:42 am
both on a block-by-block basis and the image as a whole?
Avatar
dunkelschwamm 2/9/2022 4:44 am
on mine I did consistent gradient shading on each block, then a vertical gradient shade over the whole texture, and then after feedback I went through and applied additional gradients at different levels to each individual block (edited)
Avatar
because like
4:46 am
this is looking very "now draw the rest of the owl"
4:47 am
Avatar
Avatar
dunkelschwamm
this is my current output
you already got this pretty good cinderblock wall from nothing
4:51 am
Just realized that the cinder blocks on the 1st and 3rd rows touch directly with no mortar 😩
Avatar
dunkelschwamm 2/9/2022 4:52 am
I'm a professional artist sitting in for participation more than a student, don't base your progress off of me
Avatar
ok with woolie wool's images i see the process
Avatar
🧠 = 🍳
Avatar
pretty damn good
Avatar
Could have been better if I weren't frustrated and somewhat in a rush
Avatar
Avatar
Kovacs
Click to see attachment 🖼️
kind of reminds me of when my parents bought me "how to draw like a pro" books as a kid and they were full of esoteric art supplies I had no understanding of
4:54 am
"but what if I don't have a tortillon" "fuck you"
Avatar
very good
4:55 am
I think what you could do is
4:55 am
Copy that texture from the center block , and paste it over the ones with the darkened edges
Avatar
Later I think I'll just paste something over the base layer
4:57 am
But not now 😩
4:57 am
4:57 am
Now the mortar tiles properly
Avatar
the mortar on those edges would look doubled
4:58 am
thicker
4:58 am
since it's combining the pixels from both sides when tiling
Avatar
The gradient light shadows on the blocks make it look very interesting.
4:58 am
Better than if they were just plain.
Avatar
Avatar
Kovacs
how would you do this cinderblock texture aurora
How I would do it?
Avatar
yeah, a step by step
4:59 am
Pretty much take the front face from that
4:59 am
Just forgo the metal reflective stuff
5:00 am
Now you have a shading layer for the cinder block
5:00 am
I might even out that crap on the bottom and right edges too
5:01 am
this is almost good enough to use for a mod except for the pillowing around the edges of the base texture
Avatar
i've seen a guide on making sky textures for doom, that you should actually move the edges to the center of the image so it's easier to work with tiling
👆 1
Avatar
Is that it for today? If so I'm going to go out and get a beer
Avatar
Avatar
Executor
Is that it for today? If so I'm going to go out and get a beer
Uploading a video
Avatar
and yeah i'd definitely use that
Avatar
art tip #1: don't use an editor with severe compatibility issues lmao
Avatar
Avatar
Kovacs
i've seen a guide on making sky textures for doom, that you should actually move the edges to the center of the image so it's easier to work with tiling
I copy it four times and then work on the middle piece, then cut it out of the picture and I've got a tileable texture
5:03 am
as in, this
5:04 am
Then once done, repeat the process to shift the offset back
Avatar
Avatar
Aurora
The gradient light shadows on the blocks make it look very interesting.
I learned this trick working on status bars
Avatar
i'm downloading PSP9 rn
5:08 am
i might as well try my hand since i'm here
Avatar
my computer is slowing down with this upload lol
5:14 am
Lecture's over anyway
5:14 am
I'll post the video once it's done
5:14 am
Thanks everyone!
Avatar
dunkelschwamm 2/9/2022 5:15 am
thank you, professor
Avatar
i can't even find where to draw a circle
5:21 am
my quest is over
Avatar
dunkelschwamm 2/9/2022 5:24 am
when in doubt trust mspaint
5:24 am
Avatar
i found it, the paint brush
5:26 am
i figured there'd be a specific shapes tool
5:31 am
5:31 am
eh?
Avatar
Not bad. I might place the bright spot slightly more to the edge, but I don't think it matters.
5:32 am
So nevermind, actually see what it's like once the backlight is added.
Avatar
i undid that to try again and now i can't get it anywhere as good
Avatar
dunkelschwamm 2/9/2022 5:35 am
good practice. Beginner's luck isn't anything to learn by
5:39 am
not sure i'm even doing the hand movements for this properly
Avatar
dunkelschwamm 2/9/2022 5:40 am
I think the more important thing is to have the general blurry light you have there, and then a somewhat more solid glare highlight circle
5:42 am
5:42 am
perhaps
5:43 am
no i get the concept, it's just the artist's hand part of it to get it right
5:43 am
it kept ending up with a very obvious dark spot in the middle
5:44 am
5:44 am
maybe too hard (edited)
Avatar
you clicked once for the brush?
5:59 am
idk
5:59 am
i might just wait for the video
Avatar
alternative cinder blocks
6:09 am
Using a different and much rougher ArEyeP texture as the base
6:10 am
Should I shade the horizontal mortar strips for a greater illusion of depth blazthink
6:15 am
horizontal strips are darkened with a black overlay of transparency 67, and the mortar pixels above and below each strip with a similar overlay of transparency 84
Avatar
looks ready to be used to me
6:20 am
though that dark stripe on lower right might not look great when tiled, too harsh
Avatar
looks fine to me
Avatar
Avatar
Kovacs
no i get the concept, it's just the artist's hand part of it to get it right
I literally clicked once on the sphere, didn't even move the brush.
Avatar
yeah then i was doing something wrong because clicking once just faintly brightened it up
Avatar
Avatar
Executor
looks fine to me
That is really quite beautiful. If I have one criticism though, it's that the continuity of the texture across the different cinder blocks makes it look too obviously like a texture.
6:22 am
The cinder blocks would probably not be arranged like a puzzle to form this coherent texture.
6:23 am
It'd probably be discontinuous.
Avatar
You're right, I just noticed that
Avatar
here's what i get clicking once
6:26 am
barely visible
Avatar
You might try adjusting the "step" though my editor doesn't have that
Avatar
max or min step have no effect
6:27 am
at least, in terms of strength
6:29 am
density makes a noise effect which is cool
Avatar
I actually used a normal brush, not lighte/darken
6:29 am
a white brush
6:37 am
6:37 am
huh cool
6:37 am
...what is this doing
Avatar
Very good, much better
6:39 am
For both
Avatar
I'd adjust it so the backlight begins from the darker shades nearer to the edge
Avatar
can you remove a point somehow
6:44 am
in the curve screen
6:44 am
oh drag it to another
Avatar
I'd try hotkeys, but usually I just restore the default and redo
6:52 am
uh?
6:57 am
ok this might be the good one
👍 1
Avatar
That one looks fine. Without even analyzing it, it just looks right
2:51 pm
Here's the video I promised.
Avatar
Avatar
Aurora
So what I do is draw a concept of my wall on paper first
Continuing to draw this wall, which I sketched earlier.
2:53 pm
I'm recycling textures I've created before. Once you start having a collection of materials like this yourself, you can start doing the same, rather than redrawing everything every time.
Avatar
@Kovacs For the next lecture, I'll be more thorough and make an animation for each step, and pin them. I'll try to have those animations ready to begin with, as well
3:10 pm
I'll walk through the cinder block wall; I hadn't particularly planned on a cinder block wall, it's just what people wanted to do. You may as well have made any kind of wall.
Avatar
nice, yeah a bit more granular steps are always good when trying to teach, especially people who have no clue like me
3:12 pm
i couldn't continue towards the cube because i got distracted by some things but i'll get to it
3:13 pm
and i think the cinder block is actually a pretty nice general example because a brick wall like that is THE quintissential wolf3d texture (edited)
Avatar
I agree, it's a pretty good starting point
3:15 pm
Shading rectangles, combining two types of texture (brick and mortar), optionally adding shadows below the bricks, and ensuring it tiles horizontally
3:16 pm
Anyway, for archival purposes to avoid filling the thread with random discussion, I'm closing it now.
Avatar
Actually I'll just uhh, keep it open, in case people who drop in want to follow this and post their own attempts and questions and such
Avatar
Avatar
Kovacs
ok this might be the good one
spiciestpepper333 5/9/2022 2:32 pm
LET'S FUCKING GOOOOOOOOOOOOO
2:32 pm
FINALLY
2:32 pm
SPHERE
Avatar
Show us
Avatar
Oo wall making info
Exported 357 message(s)
Timezone: UTC+9.5