Add a Rocket Launcher (Wolf4SDL)

Rocket launchers are a weapon introduced in the last three episodes of Wolfenstein 3D, but only for the Boss enemies. Let's fix that!

This guide will take you through the steps to adding a Rocket Launcher for the player to use in your Wolf4SDL project.

By the end you will have learned:

  • How to add definitions for new sprites in your game.
  • How to add new definitions for images (Such as the statusbar) in your game.
  • How to add a new weapon.
  • How to manipulate weapon behaviour.
  • How to create an item for the player to collect.
  • How to add items to your editor to place on a map.

This guide assumes you have a new Wolf4SDL project set up that compiles. If not, check out our guide on Setting up the Wolf4SDL Source Code

The first step in creating a new weapon in the game is to tell it the weapon exists.

To do that, we'll need to open the WL_DEF.H file, and locate the following section of code:

enum
{
    bt_nobutton=-1,
    bt_attack=0,
    bt_strafe,
    bt_run,
    bt_use,
    bt_readyknife,
    bt_readypistol,
    bt_readymachinegun,
    bt_readychaingun,
    bt_nextweapon,
    bt_prevweapon,
    bt_esc,
    bt_pause,
    bt_strafeleft,
    bt_straferight,
    bt_moveforward,
    bt_movebackward,
    bt_turnleft,
    bt_turnright,

    NUMBUTTONS
};


typedef enum
{
    wp_knife,
    wp_pistol,
    wp_machinegun,
    wp_chaingun,

    NUMWEAPONS
} weapontype;

These two structures define the names used for 1) the buttons in the game and 2) the weapons the player can have. We want to tell the game that there is a Rocket Launcher, and have a button to select it. So, we'll create a bt_readyrocketlauncher for the button and a wp_rocketlauncher for the weapon itself, inserting each definition in after the chaingun:

...

    bt_readyknife,
    bt_readypistol,
    bt_readymachinegun,
    bt_readychaingun,
    bt_readyrocketlauncher,
    bt_nextweapon,
    bt_prevweapon,
...
...
{
    wp_knife,
    wp_pistol,
    wp_machinegun,
    wp_chaingun,
    wp_rocketlauncher,

    NUMWEAPONS
...

We make sure to insert these new items into that section of the list, because these lists essentially function as "names" for numbers, working from 0 upwards. So in the "weapontype" structure, wp_knife is 0, wp_pistol is 1, wp_machinegun is 3, and so forth. Putting these items in an unintended order can have weird effects on your game, so be careful.

NUMBUTTONS and NUMWEAPONS are variables that tell the game how many of each there are (buttons and weapons respectively). In Wolf4SDL they must always be positioned as the last item in their lists to make sure that number is accurate!

A definition needs to be added for the collectible version of the Rocket Launcher item, assuming you want the player to be able to collect it. If you scroll down  your WL_DEF.H you'll find the following structure:

typedef enum {
    none,
    block,
    bo_gibs,
    bo_alpo,
    bo_firstaid,
    bo_key1,
    bo_key2,
    bo_key3,
    bo_key4,
    bo_cross,
    bo_chalice,
    bo_bible,
    bo_crown,
    bo_clip,
    bo_clip2,
    bo_machinegun,
    bo_chaingun,
    bo_food,
    bo_fullheal,
    bo_25clip,
    bo_spear
} wl_stat_t;

Simply add a new variable for the weapon (Order is not important, but for convenience we will be placing it after the chaingun):

...
    bo_clip,
    bo_clip2,
    bo_machinegun,
    bo_chaingun,
    bo_rocketlauncher,
    bo_food,
    bo_fullheal,
...

The player will need to be able to switch to the weapon, and for that we need to add a new key to the buttonscan array in WL_PLAY.C. In GLOBAL VARIABLES, find:

...
int dirscan[4] = { sc_UpArrow, sc_RightArrow, sc_DownArrow, sc_LeftArrow };
int buttonscan[NUMBUTTONS] = { sc_Control, sc_Alt, sc_LShift, sc_Space, sc_1, sc_2, sc_3, sc_4, sc_5 };
int buttonmouse[4] = { bt_attack, bt_strafe, bt_use, bt_nobutton };
...

That very simply makes the number 5 key usable. If you have more weapons, additions are straightforward (sc_6, sc_7, etc).

That's all the variables we need to add (for now)! Next we'll add the sprites for the weapon to the game.

When adding a weapon, you will need to add multiple sprites to the game:

  • A sprite for the weapon's pickup collectible
  • A sprite for the weapon's idle state (When the player has the weapon equipped but is not attacking)
  • Multiple sprites for the weapon animation

For this guide, we are assuming the Rocket Launcher will be using 4 frames of animation, in line with the default weapons.

To do this, we will need to locate this code in WL_DEF.H:

//
// sprite constants
//

enum
{
    SPR_DEMO,
#ifndef APOGEE_1_0
    SPR_DEATHCAM,
#endif
//
// static sprites
//
    SPR_STAT_0,SPR_STAT_1,SPR_STAT_2,SPR_STAT_3,
    SPR_STAT_4,SPR_STAT_5,SPR_STAT_6,SPR_STAT_7,
...

This is the structure that defines the name of each sprite present in the game, in order as they appear in the released game's VSWAP.WL6 file. For ease, we will want to add our sprites to the end of the file. So scroll down until you reach the end of the (long) list of sprites, and add the spirtes for our new weapon:

    SPR_MACHINEGUNREADY,SPR_MACHINEGUNATK1,SPR_MACHINEGUNATK2,MACHINEGUNATK3,
    SPR_MACHINEGUNATK4,

    SPR_CHAINREADY,SPR_CHAINATK1,SPR_CHAINATK2,SPR_CHAINATK3,
    SPR_CHAINATK4,

    SPR_RLAUNCHER_PICKUP,

    SPR_RLAUNCHERREADY,SPR_RLAUNCHERATK1,SPR_RLAUNCHERATK2,SPR_RLAUNCHERATK3,
    SPR_RLAUNCHERATK4,


};

You can name sprites whatever you want, but whatever you name them, try to keep it consistant to make it easier when you're doing related coding later.

For example, you do not want to name your sprites SPR_ROCKETLAUNCHERATK1, RLAUNCHERATK2 and SPR_LAUNCHERATTACK3 as it would be harder to remember, and you'll potentially waste time checking). Keep it simple.


Adding the sprites to the actual game

Those are all the definitions needed for the weapon and item. Before we continue, we'll take a moment to add the sprites to the actual game files.

Using a Wolf3D editor such as Adam Biser's WDC, add the six new sprites to the end of the list of sprites (Directly after the chaingun sprites if a fresh copy of Wolfenstein 3D is being edited).
If you have not set up your project in WDC or the editor of your choice, take a few minutes to do so.

Add Sprite

If you need some placeholder sprites until you make your own, there is a download at the bottom of this page with the rocket launcher from the original specs for Rise of the Triad. Conner94 edited them to be compatible with the Wolfenstein 3D palette.

Assuming you are following this tutorial as shown, make sure those sprites are in order (Collectible pickup first, then the idle/ready sprite, followed by the four animation sprites.

While the weapon is now defined in the game and it has sprites, the game hasn't been told what to do with this information. In the next step, we'll tell the game that our new sprites are for a weapon, and create our collectible version of it.

With the addition of a new weapon, we'll need a new image for the statusbar to display.

To add a new image to use on the statusbar, we'll need to start by opening GFXV_WL6.H (This file is specific to Wolfenstein 3D. Spear of Destiny operates out of a different file and may have differences). This is the file that lists all the images contained in the VGAHEAD file of the game. Without being listed here, the game won't recognize the image exists.

These images need to be listed in order, so make sure that images placed inside the VGAHEAD file match their placement in this source code file. For this guide we will be inserting the image in after the gatling gun image. So, locate it in the list, and insert out new image name:

    // Lump Start
    KNIFEPIC,                            // 91
    GUNPIC,                              // 92
    MACHINEGUNPIC,                       // 93
    GATLINGGUNPIC,                       // 94
    ROCKETLAUNCHERPIC,
    NOKEYPIC,                            // 95

And slightly later in the list, we want to fill in a gap to make life easier. Find GETPSYCHEDPIC, and make the following changes:

...
    GETPSYCHEDPIC,                       // 134

    TILE8,

    ORDERSCREEN,
    ERRORSCREEN,                         // 137
...

We add TILE8, and removed the =136 equation from the ORDERSCREEN line. With TILE8 being defined, ORDERSCREEN will automatically be 136, and increase as more images are added.

We need to make a few more changes too, later in the file.

...
//
// Data LUMPs
//
#define README_LUMP_START        3
#define README_LUMP_END          9

#define CONTROLS_LUMP_START      10
#define CONTROLS_LUMP_END        42

#define LEVELEND_LUMP_START      43
#define LEVELEND_LUMP_END        85

#define LATCHPICS_LUMP_START     91
#define LATCHPICS_LUMP_END       134
...

The images are divided up into their different sections, and these lines tell the game where the sections start and end. These are all hard-coded numbers at the moment, but we can make a few changes:

...
//
// Data LUMPs
//
#define README_LUMP_START        H_BJPIC
#define README_LUMP_END          H_BOTTOMINFOPIC

#define CONTROLS_LUMP_START      C_OPTIONSPIC
#define CONTROLS_LUMP_END        C_JOY2PIC

#define LEVELEND_LUMP_START      L_GUYPIC
#define LEVELEND_LUMP_END        L_BJWINSPIC

#define LATCHPICS_LUMP_START     KNIFEPIC
#define LATCHPICS_LUMP_END       GETPSYCHEDPIC
...

Each image name represents a number (As shown in the line H_BJPIC=3,). So when the code reads the line here, it's still seeing that #define README_LUMP_START is 3.

Normally if we inserted the ROCKETLAUNCHERPIC into the list, we'd need to shift these numbers down every time. Instead, now it shifts automatically as the images are moved.

We will want to do similar things in the lines below:

...
#define NUMCHUNKS    ENUMEND // This is always at the end, so much like NUMWEAPONS will always be equal to the total number.
#define NUMFONT      2
#define NUMFONTM     0
#define NUMPICS      ((TILE8 - 1) - NUMFONT) // This will check the last image before TILE8, and subtract NUMFONT to get the total.
#define NUMPICM      0
#define NUMSPRITES   0
#define NUMTILE8     72
#define NUMTILE8M    0
#define NUMTILE16    0
#define NUMTILE16M   0
#define NUMTILE32    0
#define NUMTILE32M   0
#define NUMEXTERNS   13
...

The final chunk of code in this file is the same concept; replacing whole numbers with their appropriate images.

...
#define STARTFONT    1
#define STARTFONTM   3
#define STARTPICS    3
#define STARTPICM    TILE8
#define STARTSPRITES TILE8
#define STARTTILE8   TILE8
#define STARTTILE8M  ORDERSCREEN
#define STARTTILE16  ORDERSCREEN
#define STARTTILE16M ORDERSCREEN
#define STARTTILE32  ORDERSCREEN
#define STARTTILE32M ORDERSCREEN
#define STARTEXTERNS ORDERSCREEN
...

With these changes, the ROCKETLAUNCHERPIC will be understood by the game, and we have the flexibility to add new images by simply appending them to the list. All the other variables will change automatically as long as the beginning name and end of each section of images remains the same!

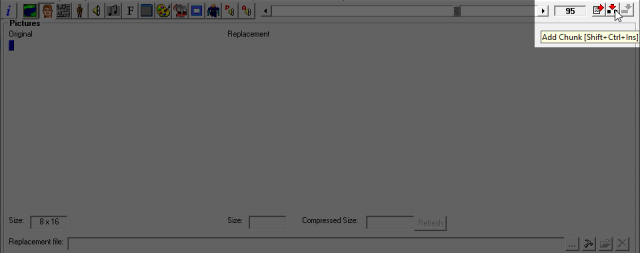
Now, we will need to add the image for the rocket launcher into our game files, in the right spot. With your project open in WDC, go to the Pictures tab, and scroll through the images in the file until you get to the image after the chaingun. In the base version of Wolfenstein 3D, this should be the small blue rectangle that represents not having a key, NOKEYPIC in the source code (WDC counts this correctly as image 95).

Click Add Chunk, and a space for a new image will be inserted before the currently active image, pushing the NOKEYPIC image up to number 96. A new dialog box will open up, asking for what .BMP image file to use for this new chunk. Select the image you have chosen as the statusbar image for the rocket launcher.

Add Chunk

Build your game files, and now we have a statusbar image ready for when the weapon is fully implemented.

First, we'll open WL_DRAW.C and tell the game to treat our SPR_RLAUNCHERREADY sprite as an idle weapon sprite. Scroll down to the DrawPlayerWeapon array and edit the weaponscale array just above it:

...
/*
==============
=
= DrawPlayerWeapon
=
= Draw the player's hands
=
==============
*/

int weaponscale[NUMWEAPONS] = {SPR_KNIFEREADY, SPR_PISTOLREADY,
    SPR_MACHINEGUNREADY, SPR_CHAINREADY, SPR_RLAUNCHERREADY};

void DrawPlayerWeapon (void)
{
    int shapenum;

#ifndef SPEAR
    if (gamestate.victoryflag)
    {
...

Thanks to the NUMWEAPON variable, the game always knows how many weapons have been added to the game, it just needs to be pointed to the "starter" sprite for each weapon, which we've now done.

We already have an item defined for the rocket launcher item that the player picks up, but we have to tell the game what it is and what it does. First, we'll open WL_AGENT.C and scroll down to the GetBonus function.
This function tells the game what effect collecting an item will have.

...
/*
===================
=
= GetBonus
=
===================
*/
void GetBonus (statobj_t *check)
{
    if (playstate == ex_died)   // ADDEDFIX 31 - Chris
        return;

    switch (check->itemnumber)
    {
        case    bo_firstaid:
            if (gamestate.health == 100)
                return;

            SD_PlaySound (HEALTH2SND);
            HealSelf (25);
            break;

        case    bo_key1:
        case    bo_key2:
...

Scroll down the switch statement inside GetBonus until you find the entries for the other weapons. While it doesn't matter where your new entry goes, we'll keep it grouped with the other weapons for organization.

...
        case    bo_machinegun:
            SD_PlaySound (GETMACHINESND);
            GiveWeapon (wp_machinegun);
            break;
        case    bo_chaingun:
            SD_PlaySound (GETGATLINGSND);
            facetimes = 38;
            GiveWeapon (wp_chaingun);

            if(viewsize != 21)
                StatusDrawFace (GOTGATLINGPIC);
            facecount = 0;
            break;
        case    bo_rocketlauncher:
            SD_PlaySound (GETGATLINGSND);
            GiveWeapon (wp_rocketlauncher);
            break;
...

Inside of our entry for the rocketlauncher, we have two lines:

  1. SD_PlaySound, which tells the game what audio clip to play when the item is collected. For the sake of simplicity in this guide, we've specified the same sound that is used when picking up the chaingun.
  2. GiveWeapon, which as it's name says, gives the player a weapon.

! Experiment!

The GetBonus function is used for every collectible, from keys to treasure. Take a look at the other cases in the switch statement to see how the other items are built.

Wolf3D has multiple functions for rewarding the player, whether it be the GiveWeapon function we just used, or other things like GiveAmmo which will give the player an amount of ammo (As an example, GiveAmmo(6); will reward the player with 6 bullets).

Once you've looked at what is available, try adding extra lines to the bo_rocketlauncher code, rewarding the player with 2000 score and an extra life.

...
         case    bo_rocketlauncher:
             SD_PlaySound (GETGATLINGSND);
             GiveWeapon (wp_rocketlauncher);
             GivePoints (2000);
             GiveExtraMan ();
             break;
...

Now, we need to open WL_ACT1.C, and towards the top of the file we have the list of "objects" in the game, which includes collectible pickups.

...
statinfo_t statinfo[] =
{
    {SPR_STAT_0},                           // puddle          spr1v
    {SPR_STAT_1,block},                     // Green Barrel    "
    {SPR_STAT_2,block},                     // Table/chairs    "
    {SPR_STAT_3,block,FL_FULLBRIGHT},       // Floor lamp      "
    {SPR_STAT_4,none,FL_FULLBRIGHT},        // Chandelier      "
    {SPR_STAT_5,block},                     // Hanged man      "
    {SPR_STAT_6,bo_alpo},                   // Bad food        "
...

We will want to scroll down to the bottom of this array, and add our new item to the bottom of the list.

...
    {SPR_STAT_45,block},                    // stove           " (SOD:gibs)
    {SPR_STAT_46,block},                    // spears          " (SOD:gibs)
    {SPR_STAT_47},                          // vines           "
    //
    // NEW PAGE
    //
    #ifdef SPEAR
    {SPR_STAT_48,block},                    // marble pillar
    {SPR_STAT_49,bo_25clip},                // bonus 25 clip
    {SPR_STAT_50,block},                    // truck
    {SPR_STAT_51,bo_spear},                 // SPEAR OF DESTINY!
    #endif

    {SPR_STAT_26,bo_clip2},                 // Clip            "
    {SPR_RLAUNCHER_PICKUP,bo_rocketlauncher},    // Rocket Launcher
...

This connects our sprite to the bonus pickup ability, telling the game what the object does.

Slightly further down we have another switch statement inside of the SpawnStatic function. This function lists all the collectible objects in the game. We will want to add our rocket launcher to the list:

        case    bo_machinegun:
        case    bo_chaingun:
        case    bo_rocketlauncher:
        case    bo_food:
        case    bo_alpo:
        case    bo_gibs:
        case    bo_spear:
            laststatobj->flags = FL_BONUS;
            break;

Now the game will know to react should the player encounter the rocket launcher in game. Next, we will finally look at the weapon behaviour, and how to make the attack happen!

Now, let's open WL_AGENT.C and look in LOCAL VARIABLES. Inside, we can see the attackinfo array:

...
} attackinfo[4][14] =
{
    { {6,0,1},{6,2,2},{6,0,3},{6,-1,4} },
    { {6,0,1},{6,1,2},{6,0,3},{6,-1,4} },
    { {6,0,1},{6,1,2},{6,3,3},{6,-1,4} },
    { {6,0,1},{6,1,2},{6,4,3},{6,-1,4} },
};
...

This array is divided into 4 lines, one for each weapon. Inside each line is a set of variables for each stage of the weapon's firing animation.

The numbers each represent a different thing, and are used by the T_Attack function towards the bottom of the file:

  1. tics - This is the amount of time (One tic = 1/70th of a second) that the frame of the animation will play. By default, the weapons in Wolf3D play each frame for 6 tics, or 6/70 of a second.
  2. attack - This is the number checked to see if additional behaviours are initiated. The numbers that can be used at current are:
    0 - No attack, just show the frame
    1 - Gun attack
    2 - Knife attack
    3 - Repeat machinegun firing
    4 - Repeat chaingun firing

    And -1 kills the animation.
  3. frame - The animation frame to be used.

To add the new weapon, the array is altered as thus:

...
} attackinfo[NUMWEAPONS][14] =
{
    { {6,0,1},{6,2,2},{6,0,3},{6,-1,4} },
    { {6,0,1},{6,1,2},{6,0,3},{6,-1,4} },
    { {6,0,1},{6,1,2},{6,3,3},{6,-1,4} },
    { {6,0,1},{6,1,2},{6,4,3},{6,-1,4} },
    { {6,0,1},{6,1,2},{6,0,3},{6,-1,4} }, // Rocket Launcher
};
...

We also changed the size of the array from 4 to NUMWEAPONS. This is to make the addition of more weapons easier in future. Since NUMWEAPONS will always be equal to the number of weapons in the game, using it as the size will save having to edit it every time a weapon is added.

! Experiment!

Try changing the knife to fire three times as fast, and to attack repeatedly if the button is held down in the same way as the machinegun.

...
} attackinfo[NUMWEAPONS][14] = 
{
    { {2,0,1},{2,2,2},{2,3,3},{2,-1,4} }, 
    { {6,0,1},{6,1,2},{6,0,3},{6,-1,4} }, 
    { {6,0,1},{6,1,2},{6,3,3},{6,-1,4} }, 
    { {6,0,1},{6,1,2},{6,4,3},{6,-1,4} },
...

The first variable is "tics" (1 tic = 1/70 of a second), and shortening the amount of tics from 6 to 2 for each frame will speed up the animation. Changing the third frame of the knife to use an attack of "3" instead of "0" will make the knife use the machinegun's behaviour, causing repeat knife attacks if the attack button is held down.

The details we have put in have the rocket launcher firing a pistol shot if the player attacks. In the next page, we'll look at creating a projectile attack to use instead, and integrating it so that it can be used in the attackinfo array.

This part of the guide utilizes Richter Belmont's code tutorial from DieHard Wolfers, which can be found here.

In WL_AGENT.C again, this time we want to go back up to the top of the file and add a definition:

// WL_AGENT.C

#include "wl_def.h"
#pragma hdrstop

extern   statetype s_rocket;

/*
=============================================================================

                                LOCAL CONSTANTS
...

Then scroll down to the KnifeAttack function, where we will put a new function, called RocketLauncherAttack.

...
void RocketLauncherAttack (objtype *ob)
{
    if (gamestate.ammo < 1)
       return;
    SD_PlaySound (MISSILEFIRESND);
   
    GetNewActor ();

    newobj->state = &s_rocket;
    newobj->ticcount = 1;

    newobj->x = ob->x ;
    newobj->y = ob->y ;
    newobj->tilex = newobj->x >> TILESHIFT;
    newobj->tiley = newobj->y >> TILESHIFT;

    newobj->obclass = rocketobj;
    newobj->dir = nodir;
    newobj->angle = ob->angle;
    newobj->speed = 0x4200l;
    newobj->flags = FL_NONMARK | FL_BONUS;
    newobj->active = ac_yes;
}

/*
===============
=
= T_KnifeAttack
=
= Update player hands, and try to do damage when the proper frame is reached
=
===============
*/

void    KnifeAttack (objtype *ob)
{
    objtype *check,*closest;
...

This is the code that spawns a new rocket "object" in the game, and sets all its variables including speed and angle it flies. Now, we will go to the T_Attack function towards the bottom of the file, and look at the switch statement inside:

...
        switch (cur->attack)
        {
            case -1:
                ob->state = &s_player;
                if (!gamestate.ammo)
                {
                    gamestate.weapon = wp_knife;
                    DrawWeapon ();
                }
                else
                {
                    if (gamestate.weapon != gamestate.chosenweapon)
                    {
                        gamestate.weapon = gamestate.chosenweapon;
                        DrawWeapon ();
                    }
                }
                gamestate.attackframe = gamestate.weaponframe = 0;
                return;

            case 4:
                if (!gamestate.ammo)
                    break;
                if (buttonstate[bt_attack])
                    gamestate.attackframe -= 2;
            case 1:
                if (!gamestate.ammo)
                {       // can only happen with chain gun
                    gamestate.attackframe++;
                    break;
                }
                GunAttack (ob);
                if (!ammocheat)
                    gamestate.ammo--;
                DrawAmmo ();
                break;

            case 2:
                KnifeAttack (ob);
                break;

            case 3:
                if (gamestate.ammo && buttonstate[bt_attack])
                    gamestate.attackframe -= 2;
                break;
        }
...

This is where the "attack" information in the attackinfo array (from the previous page of this guide) is translated into actual actions by the game. As an example, "case 1" is the Gun Attack process, and when it is called by attackinfo, it will activate GunAttack, and remove ammo from the player.

We will want to add a new unique case for the rocket launcher:

...
            case 2:
                KnifeAttack (ob);
                break;
            case 5:
                RocketLauncherAttack (ob);
                if (!ammocheat)
                    gamestate.ammo--;
                DrawAmmo ();
                break;

            case 3:
                if (gamestate.ammo && buttonstate[bt_attack])
...

Now, we go back up to the attackinfo array at the top of the file:

...
} attackinfo[NUMWEAPONS][14] =
{
    { {6,0,1},{6,2,2},{6,0,3},{6,-1,4} },
    { {6,0,1},{6,1,2},{6,0,3},{6,-1,4} },
    { {6,0,1},{6,1,2},{6,3,3},{6,-1,4} },
    { {6,0,1},{6,1,2},{6,4,3},{6,-1,4} },
    { {6,0,1},{6,1,2},{6,0,3},{6,-1,4} }, // Rocket Launcher
};
...

Right now we still have the rocket launcher set to an attack value of "1", which is the Gun Attack. Now that we have a new attack type specifically for the rocket launcher, we'll want to change it to call that one instead.

...
} attackinfo[NUMWEAPONS][14] =
{
    { {6,0,1},{6,2,2},{6,0,3},{6,-1,4} },
    { {6,0,1},{6,1,2},{6,0,3},{6,-1,4} },
    { {6,0,1},{6,1,2},{6,3,3},{6,-1,4} },
    { {6,0,1},{6,1,2},{6,4,3},{6,-1,4} },
    { {6,0,1},{6,5,2},{6,0,3},{6,-1,4} }, // Rocket Launcher
};
...

The last changes we need to make are in a different file, WL_ACT2.C. This is the file that contains most of the information about non-player "actors" (enemies, projectiles).

At the top of the file, add the following line under LOCAL CONSTANTS:

...
                               LOCAL CONSTANTS

=============================================================================
*/

#define PROJECTILESIZE  0xc000l

#define BJRUNSPEED      2048
#define BJJUMPSPEED     680
#define BJROCKETSIZE    0x6000l
...

Then locate the T_Projectile function further down, replacing it in it's entirity with the following:

void T_Projectile (objtype *ob)
{
    long   deltax,deltay;
    int      damage;
    long   speed;
    objtype *check, *extracheck;

    speed = (long)ob->speed*tics;

    deltax = FixedMul(speed,costable[ob->angle]);
    deltay = -FixedMul(speed,sintable[ob->angle]);

    if (deltax>0x10000l)
        deltax = 0x10000l;
    if (deltay>0x10000l)
        deltay = 0x10000l;

    ob->x += deltax;
    ob->y += deltay;

    if (!ProjectileTryMove (ob))
    {
#ifndef APOGEE_1_0          // actually the whole method is never reached in shareware 1.0
        if (ob->obclass == rocketobj)
        {
            PlaySoundLocActor(MISSILEHITSND,ob);
            ob->state = &s_boom1;
        }
#ifdef SPEAR
        else if (ob->obclass == hrocketobj)
        {
            PlaySoundLocActor(MISSILEHITSND,ob);
            ob->state = &s_hboom1;
        }
#endif
        else
#endif
            ob->state = NULL;      // mark for removal

        return;
    }

    if (ob->obclass == rocketobj && ob->flags & FL_NONMARK && ob->flags & FL_BONUS)
    {
        check = objlist ;
        while (check)
        {
            if (check->flags & FL_SHOOTABLE)
            {
                deltax = LABS(ob->x - check->x);
                deltay = LABS(ob->y - check->y);

                if (deltax < BJROCKETSIZE && deltay < BJROCKETSIZE)
                {
                    if (check->obclass != angelobj)
                        //   PlaySoundLocActor(MISSILEHITSND,ob);
                    ob->state = &s_boom1;     
               
                    DamageActor (check, 150);
               
                }
            }
            check = check->next ;
        }
    }

    else
    {
        {
            // Check if player hit by anything

            deltax = LABS(ob->x - player->x);
            deltay = LABS(ob->y - player->y);

            if (deltax < PROJECTILESIZE && deltay < PROJECTILESIZE)
            {   // hit the player
                switch (ob->obclass)
                {
                    case needleobj:
                        damage = (US_RndT() >>3) + 20;
                        break;
                    case rocketobj:
                    case hrocketobj:
                //   case sparkobj:
                        damage = (US_RndT() >>3) + 30;
                        break;
#ifdef SPEAR
                    case sparkobj:
                        damage = (US_RndT() >> 3) + 30;
                        break;
#endif
                    case fireobj:
                        damage = (US_RndT() >>3);
                        break;
                }

                TakeDamage (damage,ob);
                ob->state = NULL;      // mark for removal
                return;
            }
        }
        ob->tilex = ob->x >> TILESHIFT;
        ob->tiley = ob->y >> TILESHIFT;
    }
}

This new projectile code is mostly the same, but adds a new check for the player's rocket (BJROCKETSIZE), which is contained in this specific part of the new function:

    if (ob->obclass == rocketobj && ob->flags & FL_NONMARK && ob->flags & FL_BONUS)
    {
        check = objlist ;
        while (check)
        {
            if (check->flags & FL_SHOOTABLE)
            {
                deltax = LABS(ob->x - check->x);
                deltay = LABS(ob->y - check->y);

                if (deltax < BJROCKETSIZE && deltay < BJROCKETSIZE)
                {
                    if (check->obclass != angelobj)
                        //   PlaySoundLocActor(MISSILEHITSND,ob);
                    ob->state = &s_boom1;     
               
                    DamageActor (check, 150);
               
                }
            }
            check = check->next ;
        }
    }

This section of the code simplistically translates to:

  1. If the rocket belongs to the player, and
  2. hits an enemy, then
  3. explode and deal 150 damage to the enemy.

Provided you have followed this guide correctly thus far, you should be able to compile your project successfully, and have a new weapon for players to use in your game!

The player needs to be able to find the rocket launcher when it's eventually implemented, so we'll need add the map definitions to the code as well as add it to our Wolf Editor. Open WL_GAME.C, and scroll down to the ScanInfoPlane function.

...
static void ScanInfoPlane(void)
{
    unsigned x,y;
    int      tile;
    word     *start;

    start = mapsegs[1];
    for (y=0;y<mapheight;y++)
    {
        for (x=0;x<mapwidth;x++)
        {
            tile = *start++;
...

This function loads at the start of every level, going through and generating walls floors and tiles depending on what is placed on the map.

Inside is a switch statement that it compares the map to. We'll want to scroll down to case 72:

...
                case 71:
                case 72:
                case 73:                        // Rocket Launcher
#ifdef SPEAR
                case 73:                        // TRUCK AND SPEAR!
                case 74:
#elif defined(USE_DIR3DSPR)                     // just for the example
                case 73:
#endif
                    SpawnStatic(x,y,tile-23);
                    break;
...

If you are using Spear of Destiny as the code base, 73 and 74 are each taken up by additional items, so you will need to make a minor change here:

...
                case 71:
                case 72:
#ifdef SPEAR
                case 73:                        // TRUCK AND SPEAR!
                case 74:
                case 75:                        // Rocket Launcher
#elif defined(USE_DIR3DSPR)                     // just for the example
                case 73:
#endif
                    SpawnStatic(x,y,tile-23);
                    break;
...

Now that there is a number associated with the rocket launcher, we will add it to our map editor.

Many editors use a "map definitions" text file to store this information (The information generally being formatted as "NUMBER, ITEM NAME"). Each base game (Wolfenstein 3D, Spear of Destiny, Blake Stone, etc) each uses a different map definition file so make sure you edit the correct one!

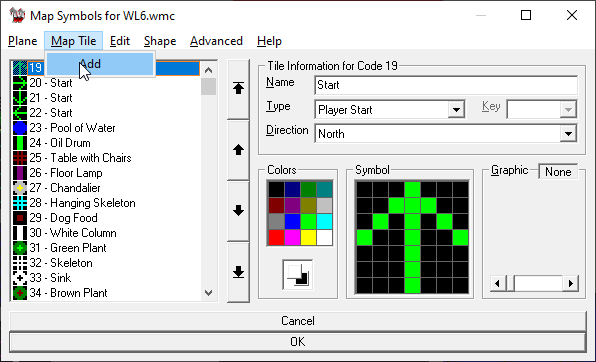
In WDC, it is done by entering Map Tools→Map Symbols in the navigation menu. This will bring up all the map symbols available to use in the Map Editor. Go to Plane→Objects/Guards to bring up the Object List, then Map Tile→Add in the new window.

MapInfo

This will prompt you to enter a number. This number is the same as the one chosen in the code earlier on this page. Once you have entered it, you will have a new entry in your map list, ready to be named, assigned a "Type" (Object), and given an icon image.

Click OK, and the new item will be usable in the map editor. Place it somewhere in a level for the player to collect!

If you followed this guide correctly your Wolf4SDL source code should compile, as should your WDC project. Provided you have placed the rocket launcher in a map, it should be available for the player to pick up and use as the fifth weapon. Congratulations!

Of course, this isn't the end. You can try experimenting and seeing what else you could do with weapons.

! Example Experiment!

The rocket launcher is magic! Can you alter the attack so that a successful hit will heal the player for 5 health, as well as damage the enemy?

In WL_ACT2.C, scroll down to our edited T_Projectile function, and make the following change:

...
            if (check->flags & FL_SHOOTABLE)
            {
                deltax = LABS(ob->x - check->x);
                deltay = LABS(ob->y - check->y);

                if (deltax < BJROCKETSIZE && deltay < BJROCKETSIZE)
                {
                    if (check->obclass != angelobj)
                        //   PlaySoundLocActor(MISSILEHITSND,ob);
                    ob->state = &s_boom1;     
               
                    DamageActor (check, 150);
                    HealSelf(5);
                }
            }
...

This function (HealSelf) is called for the healing items in the GetBonus function that we altered to create the collectible rocket launcher item. We call it alongside where the game explodes and damages the enemy, so that both happen together.

In future, we will expand these guides to make the rocket explode for area damage (A feature first brought to us by Poet) and hurt enemies around it, as well as create a new ammo type (rockets) for the weapon to use instead of bullets.