Creating fake geometry in ECWolf/LZWolf

ECWolf and LZWolf are very flexible source ports capable of some powerful visuals. 

LZWolf Quake

This guide by Diema will teach you how to use the Billboards feature in ECWolf and LZWolf to create more irregular architecture like seen above.

Note: This guide assumes you already have some knowledge on utilizing the inner workings of ECWolf/LZWolf.

To begin, let’s think about a cool 3D feature we’d like to add. In the area I showed in the introduction, let’s say I’d like to add some sloped supports leading into the light fixtures on the ceiling, like so:

LZWolf Quake Planning

Of course, even the mighty EC and LZWolf source ports can't do real sloped tiles, so we're going to have to make use of another feature: billboards. Billboards are basically sprites which transform in 3D space very similarly to walls (so, they don't constantly face the player, like gates in Rise of the Triad). Let's modify the plan a little bit:

LZWolf Quake Sketch 2

So based on this, we can see that the effect has been simplified into essentially a collection of five sprites:

LZWolf Quake Sketch 3

However, you may have noticed a problem already: if the outside of each sloped strut is textured, then that means the inside is too, thus breaking the effect! So we’re really going to need nine sprites – one for each outside segment, and one for each inside segment (except for the flat part in the back, which I’ll explain in a bit).
There will be a little bit of bleed-through because of how we’re going to set it up, but honestly, it’ll be fine – this will already be more than enough to add some impressive flair to your level, and our choice of texture in this case will mask the problem a bit.

Now that we have a general plan, let's move to the textures themselves.

Let’s generate some textures!

Quake Textures

The blue guide lines tell us the boundaries of the sprites themselves, and another four sprites can be retrieved from this setup by just horizontally flipping the ones we have. Now that we have the images, add them to your wad or pk3. Assuming you are using SLADE, you will also want to apply image offsets to the sprites. The sprites can be any height, but billboards should generally be no wider than 64px, because currently ECWolf and LZWolf have sorting and drawing issues with wider sprites. (You technically CAN use them, but they will glitch out more frequently the wider the billboard is.)

The general rule of thumb is, you want the horizontal offset to be 32 and the vertical offset to be how many pixels off the ground you want the top most row of pixels in your billboard to be drawn. For example, in the case study I have given, the level is 3 tiles high (using ROTT level settings tiles). 3*64 = 192, and since we want these sprites to be drawn on the ceiling more or less, we should give a vertical offset of 192.

Now comes the part I hate the most: the Decorate code.

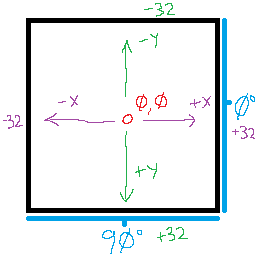
To simplify the process a bit, here I have provided a little infographic to help you understand how ECwolf/LZwolf understand the coordinates supplied by the most important command we will be using (A_SpawnItemEx):

infographic

Now, the Decorate code itself is fairly straightforward, but with some idiosyncrasies specific to EC/LZ that ZDoom users may find strange which I will explain as they come up.

////////////////////////////////////////////////////////////////////////////////////////
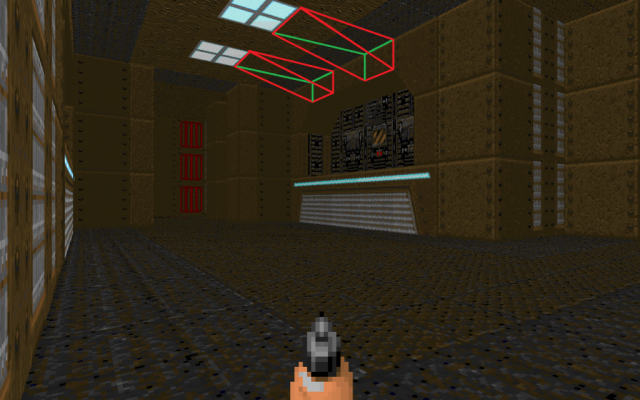
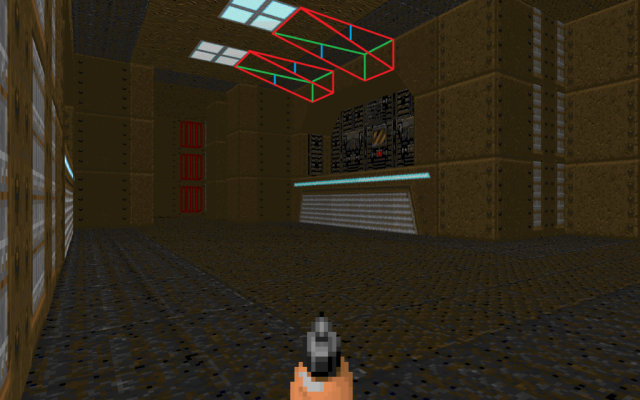
//  Sloped light fixtures (E1M1)                                                      //
////////////////////////////////////////////////////////////////////////////////////////
Actor QSlopedLightCeil1a : QBillboard
{
    States
    {
        Spawn:
            DQ00    Q    -1
            Stop
    }
}
Actor QSlopedLightCeil1b : QBillboard
{
    States
    {
        Spawn:
            DQ00    R    -1
            Stop
    }
}
Actor QSlopedLightCeil1c : QBillboard
{
    States
    {
        Spawn:
            DQ00    S    -1
            Stop
    }
}
Actor QSlopedLightCeilld : QBillboard
{
    States
    {
        Spawn:
            DQ00    T    -1
            Stop
    }
}

You can see here there is nothing particularly special about these objects, except that in this case they descend from a class called “QBillboard”. This is just a class that has a bunch of basic properties I use for all billboard objects in my project, which in this case sets “+BILLBOARD”, “-SOLID”, and if you care, they have radii of 16.

The fun really begins when we get to the spawner objects:

Actor QSlopedLightCeil1_least
{
    States
    {
        Spawn:
            TNT1    A    0
            TNT1    A    0    A_SpawnItemEx("QSlopedLightCeil1a",0,32,0,0,0,0,90)
            TNT1    A    0    A_SpawnItemEx("QSlopedLightCeil1e",0,30,0,0,0,0,90)
            TNT1    A    0    A_SpawnItemEx("QSlopedLightCeil1b",0,-32,0,0,0,0,90)
            TNT1    A    0    A_SpawnItemEx("QSlopedLightCeil1f",0,-30,0,0,0,0,90)
            TNT1    A    0    A_SpawnItemEx("QSlopedLightCeil1c",64,32,0,0,0,0,90)
            TNT1    A    0    A_SpawnItemEx("QSlopedLightCeil1g",64,30,0,0,0,0,90)
            TNT1    A    0    A_SpawnItemEx("QSlopedLightCeil1d",64,-32,0,0,0,0,90)
            TNT1    A    0    A_SpawnItemEx("QSlopedLightCeil1h",64,-30,0,0,0,0,90)
            Stop
    }
}

What a mess, eh? There’s no easy way around this – you’re just going to have to figure the spawn coordinates out on your own, but I hope the infographic above will be of some help to you when doing this.
I’ll try to simplify a bit by explaining the SpawnItemEx syntax, as I use it:

A_SpawnItemEx(x offset, y offset, 0, 0, 0, 0, angle)

…Where the x and y offsets are taken from the center of the tile, which is considered 0,0. The sprite “TNT1” is used here because not only is it guaranteed to be an empty sprite, but the engine is aware of this specific sprite name and will completely skip any rendering on it, so it’s actually faster than supplying your own “BLNKA0” sprite or whatever. Cool!

You may have also noticed there is an empty zero-length state at the beginning of the spawner’s states. This is intentional; this avoids a strange behavior in EC/LZ where A_SpawnItemEx fails to work in certain circumstances which are satisfied if that state wasn’t there. Don’t worry about it too much – just remember to include an extra zero-length state at the beginning of your spawn process.

There is one more step to perform before the game will recognize this new object. Go into your map translator (colloquially known as “XLAT”), and add a new line in the “things” section. You can specify this however you want.

Now, actually adding this object to your map editor will vary from editor to editor, but for now, I’ll assume WDC is being used. Here’s how that works:

  • Click “Map Tools” in the toolbar
  • Click “Map Symbols”
  • Select “Plane” > “Objects/Guards”
  • Select “Map Tile” > “Add”

The rest should hopefully be self-explanatory, and then you can actually use your tile in the editor.

Now, the ultimate question. How does this actually look in-game?

LZWolf Quake Finished

… Uh-oh! Looks like there are some limitations of billboards we haven’t discussed yet.

Unfortunately, there is no way to get around this… yet. You’ll notice that the billboards from the opposite outside of the slope are being rendered technically correctly, but flipped the wrong way! There’s nothing we can do about this, so our billboard effect that we were going for in this specific case is kind of ruined.
I leave it up to the developers of the amazing ECwolf and LZwolf to figure out how best to approach this problem, but why wait for that? They’ve already given you an amazing tool to use to make your maps look ten thousand times cooler, and even though we fucked it up in this tutorial, you’ve learned how to use billboards, right?! And hey, you can still use tricks like this, as long as the player can’t see the opposite side of the billboards – just like those sloped raised areas you see in these screenshots!

I hope this demonstration shows both the cool parts and the not-so-cool parts of billboards well enough so that you can understand how they can be used (read: abused). There’s lots of applications here – I leave it as an exercise to you to figure out how best to apply them.

Oh, one last note. I referenced “two” features, but I appear to have only used one in this tutorial, right? Well, I did in fact demonstrate another very basic feature of EC/LZ in the screenshots – floor and ceiling textures! Inside of all the sloped geometry, there is a flat-color texture used for the ceiling flats. That’s all there is to it!