
Guides

|
A basic RPG-style levelling systemMany games from all genres take inspiration from RPGs in the form of a "level-up" system. This system typically rewards the player "experience points" for tasks, and gives the player a "level" when a milestone is hit. Each level will generally make the player stronger in some way. For this guide, we'll be introducing such a system to Wolf3D. By the end you will have a functional but basic system for levelling, where kills will reward experience, and levels will influence the amount of damage weapons do. |

|
Add a Rocket Launcher (Wolf4SDL)Rocket launchers are a weapon introduced in the last three episodes of Wolfenstein 3D, but only for the Boss enemies. Let's fix that! |

|
Aurora's Art LecturesIn 2022, Art Lectures teaching beginners how to get into spriting and texturing were run by Aurora on the Wolf3D.net Discord. For prosperity and access, these lectures have been preserved on Wolf3D.net. |
|
Compiling the code for shareware Wolfenstein 3D and Spear of DestinyThe source code comes prepared to build version 1.4 of the full version of Wolfenstein 3D, but is actually capable of building for multiple different versions of the game, as well as Spear of Destiny! This guide will show you how to change the code to compile for different games and different versions of them. It assumes you already have a game project that successfully compiles. If not, you'll want to check out the guide for setting up a Wolf4SDL project. |
|
Creating fake geometry in ECWolf/LZWolfThis guide by Diema will teach you how to use the Billboards feature in ECWolf and LZWolf to create irregular architecture, allowing for more interesting variations in environments. |

|
ECWolf 1.4 Multiplayer FAQWith the release of version 1.4 of ECWolf, the engine now provides multiplayer! This is a collection of questions covering common issues specific to this feature of ECWolf. For more information or to see how to get started, there is a collection of official Multiplayer Notes on the ECWolf website, worth reading. |

|
ECWolf FAQECWolf is a source port for Wolfenstein 3D developed by Blzut3. It is made to increase the ease of creating and playing mods, as well as create an engine that plays all games built on the engine. It also provides some quality of life improvements including modern control schemes and screen resolutions. |
|
Enabling Feature Flags (High Resolution Textures, Cloudy Skies, etc)Wolf4SDL comes with extra features already added and just needing to be activated. This guide teaches you what is in Feature Flags, how to activate them, and how to use them. |
|
Game Release PreparationsYou've created a mod or game, and you're getting it ready to release it for people to play. First up, congratulations! Getting from inception to finished product is a great feat, and you're hopefully proud of your creation. |
|
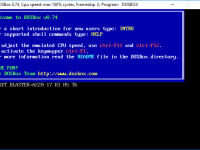
How to run programs in DosBoxModern operating systems do not come with MSDOS installed anymore. Because of this, programs like Wolfenstein 3D and it’s DOS-based editors no longer work “straight out of the box”. To fill the gap, applications like DOSBox have been developed and released that let you use these programs again in an authentic DOS-like emulation. When you first download DOSBox, it can seem a little confusing as to how to use it. But when you learn what the options are, it’s actually reasonably effortless! |

|
LZWolf FAQLZWolf is a source port for games and mods built on the Wolf3D engine. It is forked from ECWolf, containing all of ECWolf's features and access to a variant of the Decorate scripting language. It adds upon those foundations by expanding the API and merging some elements from zDoom in order to expand new mod development. While LZWolf is made with traditional Wolf3D modders in mind, Doom modders also find the engine accessible due to it's similarities with zDoom's own Decorate scripting. |

|
MapEdit - DOS Map MakingMapEdit was created by Bill Kirby in 1992, serving as one of the earliest map editing programs. Despite the advent of multiple other arguably more advanced editors MapEdit still sees active use today by avid fans, for reasons including nostalgia and it's simple interface, as well as ability to edit multiple different games and versions. This guide will help you find the right version of MapEdit for you (There are quite a few), and get you started making your own maps within the program! |
|
Mapping for ECWolfThis set of video guides by Dunkelschwamm is designed to teach you how to create maps in the editor WDC, and import them into your ECWolf or LZWolf project using SLADE. By the end of this series you will be have a functioning custom mapset for Wolfenstein 3D, complete with custom episode names! |
|
Play the iOS and Java versions of Wolfenstein games on Windows!Wolfenstein 3D and the oft-forgotten Wolfenstein RPG were both available on iOS back in 2009, with a version of Wolfenstein RPG also being available for Java-compatible phones. Unfortunately, neither title was updated to keep up with the operating system's major updates and are no longer available to play normally. |
|
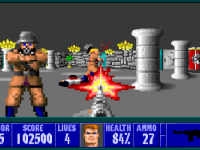
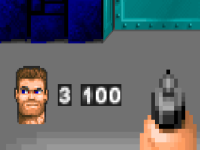
Rearranging the status barIn Wolfenstein 3D, the status bar is a static image, over which the stats pertaining to the player and game are displayed.
Of course, in a different project, this design might not be relevant. Maybe the game has more than 4 keys, or the author doesn't want to display weapons, or simply wants things in different places. |
|
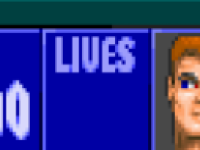
Removing the Lives system from Wolf3D (Beta)A holdover from arcade games, Wolfenstein 3D is one of many games that utilize a "Lives" system in it's game - each time the player dies they lose a life, and when they have used up all of their lives, the game is over.
The choice of using Lives is a design choice, and of course everyone has a different vision. What if you don't want to use them in your game? |
|
ROTT-style ElevatorsIn Rise of the Triad, elevators worked differently - instead of being an end level trigger, it was more of a switch activated teleporter, taking you to another part of the level. This feature has been ported to ECWolf and is controlled by a simple thing tile! This guide by AstroCreep will show you how to utilize this feature for your own project! |
|
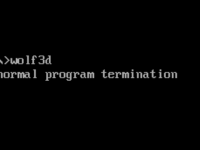
Saving Memory in DOSOnce you start adding things to the original Wolfenstein 3D engine, you may quickly come across an "Abnormal Program Termination" error. This is because for all of Wolfenstein 3D's ingenuity, it was restricted by DOS's capabilities. Prominently, a restriction in the amount of memory available to the game. |
|
sbarprot: Advanced HUD customization in LZWolfWhile latchcfg works in both ECWolf and LZWolf, the latter offers an alternative called sbarprot that allows for advanced statusbar/HUD customization. Using sbarprot, displaying information typically on the statusbar is a lot more flexible than utilizing the latchcfg method. This guide will take you through how sbarprot works, and some example changes that can be made using it. |
|
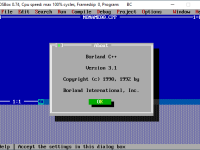
Setting up the DOS Wolf3D source codeThanks to John Carmack releasing the source code to the public back in 1995, people interested in making their own games can modify the engine itself to create whole new features and effects. At the end of this guide you will have learned how to compile a working exe for the full version of Wolfenstein 3D for DOS. The tools you will need: |
|
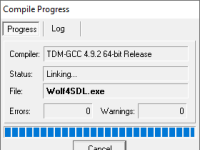
Setting up the Wolf4SDL Source CodeWolf4SDL was released in 2007, a project by DHW member Moritz "Ripper" Kroll to port Wolfenstein 3D to modern systems. While there were other notable attempts at ports like NewWolf and WinWolf3D, this particular port stood out for it's closeness to the original look and feel of the game, as well as it's relative similarities to the original source in respect to modding. This particular port has been one of the most common for people to make games using, and is even used as the base for ECWolf. |
|
Switch-Activated DoorsMuch like Rise of the Triad, ECWolf supports switch and touch plate activated doors and push walls! Contrary to popular belief, it actually isn’t too hard to pull off! In this guide by AstroCreep, you will learn how to implement these features in your own ECWolf or LZWolf project! |
The Anatomy of an XLAT FileThe Map Translator file or XLAT (no relation to ZDoom’s version) is the file that translates binary format maps into ECWolf’s internal structure. It can be named anything you want, but it must be referenced in MAPINFO in your ECWolf mod for the game to start. By the end of this guide you should have a much better understanding of what this file is, and how to alter it for your projects. |
|
Tips for creating/editing Wolf3D & Spear of Destiny DesignsThis is a guide released by Warren Buss years ago, and remains a solid starter for learning the foundations of Wolf3D mapping concepts. You can find the guide in it's original text format here. |
|

|
Using WDC for your Wolf3D ProjectWDC is by far one of the most (if not the most) flexible and detailed editors for the Wolf3D game files currently available. Created by Adam Biser, the program works with the files of nearly every game built on the engine (Except for Rise of the Triad), and can edit (Among many other things): |